Wednesday, January 27, 2016

Pruning Tips for High Desert Plants

A couple days ago I posted that it is bare root planting season. It also happens to be pruning season here in the High Desert. There are a number of reasons for pruning plants — producing more or better flowers, developing or maintaining a desired shape or appearance, reestablishing balance between roots and branches, training young plants, rejuvenating older or neglected plants, removing dead or diseased wood, and repairing or removing damaged wood.

The pruning tools available are varied and run from really cheap to very expensive. In my opinion you get what you pay for, so a good approach is to buy the best quality tools that you can afford. Some of the quality brands that are readily available include Corona, Fiskars, and Felco to name a few.

Maintenance of tools is very important for good pruning and the longevity of the tools. When sharpening your pruners, use a file, not a stone, and maintain the original beveled angle. Have a professional sharpen your saws.

Clean your tools after each use. Wipe the tools with an oily cloth – there are some products made for cleaning tools such as Corona’s CLP. Use linseed oil on wooden handles to help keep them in tip-top shape. Use a solvent to remove sap. If you have been pruning to remove diseased branches, soak the tools in a solution of nine parts water to one part bleach between each cut. Keep in mind that the bleach can be corrosive to the tools so make sure to lubricate the tool(s) afterward.

It is always a good idea to have a certified arborist come in to do big pruning jobs such as trees, or anything near power lines. Also, don’t forget safety gear such as leather gloves and goggles.

Before pruning a plant, it is important to know how it grows. Trees and shrubs grow each year from the ends of branches (terminal buds) and the side branches (lateral buds). The terminal buds determine the direction and rate of growth. Lateral buds form branches and twigs that fill in the framework of the major branches. Dormant buds are less obvious and only grow when injury occurs to the terminal or lateral buds. A key to good pruning is learning how to take advantage of the lateral and dormant buds to redirect or rejuvenate plants.

Normally, terminal buds grow faster than lateral buds because of a chemical they produce to retard the lateral growth. This is really strong in young trees and less so in shrubs. Cutting away the terminal bud allows the lateral buds to start growing more aggressively.

When making pruning cuts, the rule is to prune back to a branch or bud and don’t leave a stub (or hat rack), which will die back and cause decay or disease, not to mention being unsightly. Pruning cuts should be no more than a quarter-inch above a bud or side branch. Pruning cut angles should be at 45 degrees and tilted in the direction the bud is pointing. Plants all have buds facing inward and outward. You want to cut to a bud that is facing outward, which results in the plant having attractive outward growth rather than making a tangled mess by growing inward.

Plants that should be pruned in winter (late January, February and into March in the High Desert) include fruit trees, certain roses, broad-leafed evergreens, most trees, vines and some flowering plants.

There are generally three accepted systems for pruning fruit trees – central leader, open center and modified leader.

Apples and pears should be trained with a central leader, which forms strong side branches and one main trunk. Remove some branches growing from the trunk to maintain open space between limbs. Also, thin the secondary branches growing from these limbs in order to allow sunlight and air to reach the center of the tree. Eventually, you might want to switch apples to the modified leader method as it tends to be easier and is close to the way they want to grow naturally (see the Principles of Pruning Guide mentioned at the end of the column for details).

Fruits that should utilize the open center or vase method include quinces, cherries, crabapples, plums, peaches, nectarines and apricots. This system eliminates the central leader and allows plenty of light and air into the tree’s center, but makes for weaker branches so it is not recommended for apples or pears. Try to avoid having all of the branches arise from nearly the same point.

Many fruits such as pears, apples, plums and cherries produce their fruit on stubby growths called spurs. These spurs should not be eliminated or you will not get fruit, however thinning them is recommended.

When planting young shade trees all you need to do is trim off some of the twiggy growth that won’t be a part of the tree’s framework of branches, and twigs that are dead or broken.

Mature shade trees should only need maintenance pruning to remove dead or damaged wood or perhaps a little thinning to allow air and sunlight into the crown. Always cut limbs back to a live branch or main trunk. Cuts should be made just outside (one-quarter of an inch or so) of the branch collar (usually an obvious swelling or wrinkled area at the base of the branch). If you are trimming a large branch, use a three-cut method to reduce tearing of the bark (see photos).

Shrubs should only be pruned for maintenance. Occasionally a shrub may get too tall or broad and may need to be cut back. If it’s a flowering shrub, you need to know if it flowers on old wood or new wood. If it blooms on old wood, you want to prune it right after it flowers – examples include lilac and forsythia. If it blooms on new wood, winter is a good time to prune – examples include butterfly bush and crape myrtle.

Broadleaf evergreens, such as oleander, olive, cotoneaster, privet, euonymus and Pyracantha generally need very little pruning and are often better off if you leave them alone. The only pruning should be to remove dead, diseased or damaged wood whenever it occurs, and prune back branches that get too long.

Vines should be pruned to keep them within their bounds. If you want them to stay compact, prune terminal growth during the growing season. If you want them to ramble, cut to the base all but three or four of the strongest branches. Most flowering vines bloom on last year’s wood so avoid pruning in winter or early spring or you won’t get any flowers.

Most roses bloom in late spring, a little during the summer and again in the fall in this area. If you are pruning a newly planted rose from a container, you should only need to prune away broken or damaged growth. If it is a bare root, you will need to prune away broken or mangle root tips and twiggy growth from the top of the plant.

For maintenance pruning of roses, begin by removing dead, diseased or damaged canes. Next, prune out branches that rub together, and crossing growth in the center of the plant. A general rule of thumb is that when pruning is done, the remaining skeleton should be a vase shape (or you should be able set a small bucket inside the framework). On roses three years old or more, you should prune away about one-third of the oldest growth, then cut one- and two-year-old canes back to the height you want to maintain.

For more complete information, including diagrams, Corona Clipper (my source of information) puts out the Principles of Pruning guide, which is available for free at http://info.coronatoolsusa.com/corona_principles_guides

Use the three-cut method when sawing off large branches

1. Make an undercut at least
6 inches from the bark collar.
2. At about an inch beyond the undercut,
remove the limb with a top cut.
3. Remove the remaining stub with
one smooth cut from top to bottom
just outside the bark collar.

NOTES:

Types of pruning tools:

• Bypass- or anvil-style hand pruners: Bypass works like scissors and tend to give a better cut. Anvils can come with a ratcheting mechanism that makes it easier to use. Hand pruners come in various sizes that can cut branches up to three-quarters of an inch in diameter.
• Loppers: These are great for larger sized branches. Loppers are similar to hand pruners except that they have bigger blades and much longer handles for additional leverage, and depending on the size, can handle branched up to three inches in diameter.
• Hedge shears: These are designed with long, scissor like blades. They should be used for clipping soft young growth – never use these on harder wood.
• Saws: Bow saws are lightweight and are intended for medium sized branches. Other pruning saws can have a straight or slightly curved cutting edge. These usually cut on the pull, rather than on the push, making the work much easier. Sometimes saws are designed to be folded, making transport and storing easier and safer.
• Pole pruners: These are handy for high work, but be careful to stay away from power lines. These can be a hook and a blade similar to hand pruners, or it can be a saw, sometimes a combination of both. These are usually at the end of a long pole, generally 10 to 14 feet in length, sometimes extendable.
• Of course there are all kinds of power tools available.


Saturday, January 23, 2016

It's Bare Root Planting Season

Here it is, almost February - a new year has begun - and this means it is bare root planting season. Generally speaking, bare-root plants are available in late winter through early spring in most nurseries, garden centers and mail-order companies. Many plant varieties are available bare root - fruit and shade trees, flowering shrubs, roses, grapes, cane fruits and strawberries.

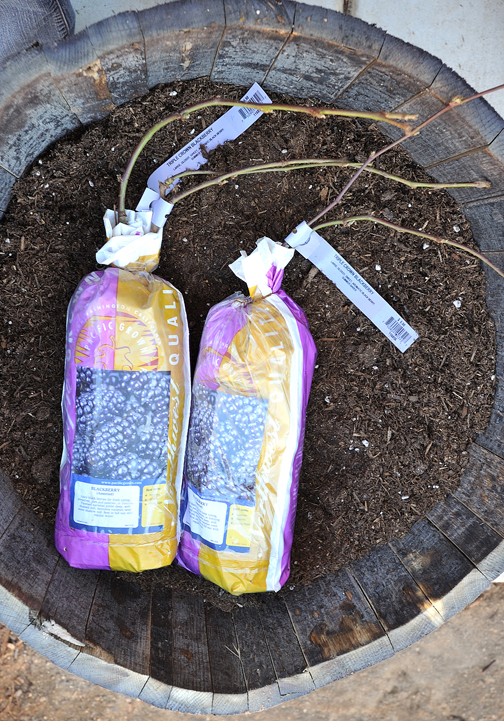
One of the bare root selections for my yard
include these thornless blackberries,
which I planted in large barrel containers.
Among the benefits of bare-root plants are that they tend to cost significantly less, and establish quicker than their containerized counterparts. One of the reasons for their quicker establishment is that when you plant bare-root plants, you generally backfill the hole with soil that was dug from the hole. This means that the roots grow in only one type of soil. When you put a containerized plant in the ground, there are two types of soils - that from the container and that from the ground. This usually creates layers with a difference in textures coming in contact with each other. When this occurs, water doesn't penetrate the rooting area evenly.

When purchasing bare-root plants, look for plants with clean, evenly colored bark, strong stems, and firm, well-formed, healthy-looking roots. Avoid plants that have leafed out, unusual swellings other than the graft union, suspicious holes, and slimy or withered roots. Of course, seeing the roots may be impossible on plants with plastic wrappers on them. Keep your receipt and return the plant to the store if you find any of these root conditions once you have opened the package.

Bare-root plants should be planted as soon as possible after purchasing. If you must delay planting, temporarily plant them in a trench with potting soil or sand on the shady side of your house and keep the roots moist, but not soggy. Whatever you do, don't let the roots dry out. Before planting, make sure to remove and discard any saw dust/wood shavings that the plant may have been packaged in, soak the roots in water for 30 minutes to four hours, and then trim off any broken or damaged roots back to healthy tissue.

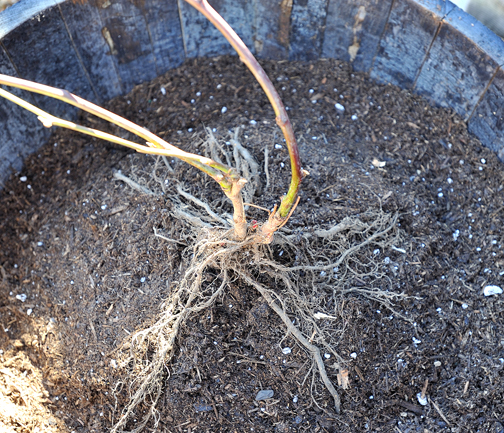
When planting bare root plants,
make a mound at the bottom of
the hole (in the ground or in containers),
spread the roots out around the mound,
and then backfill making sure
to not leave any air pockets.
When preparing the hole for bare-root plants, make a firm mound of soil in the bottom of the hole, and then spread the roots over the mound, which helps to eliminate air pockets at the center of the roots, and then position the plant to the same level it was in the growing field. Hold the plant upright as you backfill the soil, making sure to firm the soil as you go. When backfilling is almost done, adding water helps to settle the soil and eliminate air pockets. Finish filling the hole with soil, then water again. Water once or twice a week, but don't over-water while the plant is still dormant because soggy soil may inhibit new root growth, or cause existing roots to rot.

When the growing season begins, form a well from soil around the planting site. Water when the soil becomes dry at a depth of two inches.

My blackberry plant all planted in its container.
Another thing to consider when choosing bare-root, or any other fruit tree, is whether a pollinator is needed. In most cases, the label on the plant will tell you if the plant is self-pollinating/fertile or if it needs a pollinator. If it needs a pollinator, suggested varieties are usually on the label. If you have any doubts, ask a knowledgeable sales person. Common fruits that need pollinators include almonds, pears, apples, plums and cherries.

Monday, October 5, 2015

Gardening tips for fall

It's autumn - finally - my favorite time of the year. The intense heat from the summer is beginning to fade away, afternoons on the back porch are peaceful and comfortable, some of the plants are beginning to show their fall color changes, and some of the vegetable garden crops start producing again after surviving the summer sizzle. Another aspect of fall is that it is time for a few landscape and garden chores to get everything ready for winter.

Fall is the best time in the High Desert climate to install new plantings or transplant old ones. The weather is still warm enough where it is comfortable to work in, and the plants will have all of winter and spring to establish root systems that will allow them to withstand the heat of next summer.


It's also time to plant or divide spring-flowering bulbs. There's a vast array of selections in nurseries, garden centers and catalogs. Purchase bulbs that are firm, not mushy, moldy or shriveled. Instructions for planting them are usually right on the package.


Do you have a lawn? I did have a small lawn, but it looks like it did not survive the watering restrictions. If you do still have a lawn, there's plenty of work to do here. If your lawn is a cool-season grass such as fescue or bluegrass, fall is the time to add winterizing fertilizer. There are many brands to choose from. Fertilizing will help keep your lawn greener throughout most of the winter months, and make it more beautiful and lush in the spring. If you have a warm-season grass such as Bermuda or Zoysia, letting it go dormant for the winter is recommended - however, if you want to maintain a green turf throughout much of the winter, these warm season grasses can be over-seeded with annual rye or fescue. Aerating the lawn after a summer of compacting it with playing and mowing is a good idea. Aerating the lawn is a way to break through the thatch layer that may develop and allows water, air and nutrients to get deeper into the root system. Aerators for large lawns can be rented, or a lawn care company can do the job for you. For smaller lawns, a hand aerating tool can be purchased at most any garden center. When you do the final mowing of the year, mow it a little taller than normal - this will encourage deeper rooting, and leave the clippings on the lawn as a mulch to protect it from the winter chill.

Autumn is also the time to sow wildflower seeds for a flush of color in the spring. Wild flower seeds may be purchased at nurseries, but for a great blend of seeds prepared especially for the High Desert area, check with the Mojave Desert Resource Conservation District - (760) 843-6882.

Another great idea is to put a good three- to four-inch layer of mulch in your planting beds, which will help keep root systems warmer through the upcoming cold weather.

Don't forget to reduce irrigation frequency, and make sure that your irrigation system is in good shape. Reduce the risk of creating dangerous icy spots on sidewalks, driveways and streets by making sure that the water is going to the desired plants and not running off to other areas. This is also a good idea for staying in compliance with the state water restrictions due to the ongoing drought.

Thursday, August 13, 2015

It's almost time to plant veggies for fall and winter harvest


The cooler temperatures of fall are just a few weeks away and along with it are some new vegetable gardening opportunities. Many people don't know vegetable gardening can also be done in the fall.

Fall gardening is a real possibility, but it involves growing different plants than those grown for summer gardens. Soon, it will be that time of the year when some of our summer-grown veggies - tomatoes, squash, beans, corn, and peppers - have seen better days and it will be time to start cleaning up the garden and preparing for next spring. Some of the early summer garden plants are long gone, but the space may still be available. Why not use this available space and grow vegetables that are perfect for fall planting – those that typically don't do well during the summer's extreme heat.

Check out your favorite garden center or nursery for vegetable transplants, which will probably be your best bet for getting them established and closer to maturity before the wintery frost arrives. Planting seeds also works (which is what I am planting), but they need a little more time, so it is best to get started now. The idea is to get the plants as close to maturity as possible before it gets too cold. Once it gets really cold, they will stop growing. To extend the growing season and offer more protection, consider using a cold frame, greenhouse, row covers or planting in containers that can be moved into warmer areas at night.

Typical vegetables that are successful for end-of-summer/early fall planting include lettuce, bok choy, Swiss chard, radicchio, kale, turnips, broccoli, carrots, beets, peas, cauliflower, radishes, collards, spinach, Brussels sprouts, cabbage, parsnips and onions. These same vegetables also work well planted in late winter or early spring, where they can be harvested before planting the warm-season crops of summer.

I have seeds left from last year, which I will be using that includes many of the above mentioned veggies – all heirloom varieties. Plants like carrots and parsnips can overwinter in the garden and get sweeter as the temperatures get colder.


Prepare the soil just as you do for a summer garden - loosen it with a shovel or rototiller or whatever else you have that can do the job. Remove as many rocks as you can. Then, add lots of organic materials such as compost to a depth of nine to 12 inches (especially important for root crops such as carrots, beets, parsnips and turnips). Avoid adding ingredients like wood shavings unless they are very well composted. Fertilizers or nutrient amendments are a good idea - organic products being the healthier choice for the environment. If you are just extending the season from your summer garden, refresh the soil a bit with some compost – homemade or purchased – and possibly some quality fertilizers to replace what the summer crops used up. Root crops could benefit from the addition of some bone meal as well.


‘Now that your soil is ready, it’s time to plant the transplants or seeds, whichever you decide to do. Transplants should be planted so the soil level is at the top of the root ball, but not covering any part of the stem. Press the soil firmly around the root ball, being careful not to damage the baby plants. For seeds, follow the package directions, which is especially important for seed depth. If you don't have package directions to follow, a good rule-of-thumb is to plant the seed twice as deep as it is wide - a quarter-inch seed should be buried about half an inch deep. If the seeds are planted too deeply, the seedlings may rot and never make it to the soil surface.

Water everything well and keep the soil moist but not soggy while the seeds germinate and begin to establish roots. I water a couple times a day during the time when the seeds are in the germination process, then I water more deeply each morning once the seedlings begin to develop a nice-sized root system. Plenty of organic material in the soil helps ensure that the essential moisture is retained and not just draining out. As temperatures cool, you may be able to water less frequently.

There are several sources for seeds and other garden products. You can get them at our local nurseries and garden centers, but for a much wider selection, there are numerous catalogs available online. Among them are the following:
-    http://www.xmarks.com/site/www.williamrubel.com/Trescony/TRtresconyseeds.html - offers links to numerous seed catalog websites including many that feature heirloom and organic varieties.
-    Baker Creek Heirloom Seeds - www.RareSeeds.com offers over 1,200 varieties of non-GMO heirloom seeds.
-    Sustainable Seed Company - http://sustainableseedco.com - offering heirloom seeds, garden seeds, and organic heirloom seeds - non-hybrid vegetable, flower, and herb seeds.
-    Annie's Heirloom Seeds - http://www.anniesheirloomseeds.com - offers only heirloom varieties - no hybrids and no GMOs.
-    Eden Brothers - http://www.edenbrothers.com - heirloom seeds in packets or in bulk.
-    Territorial Seed Co. - www.territorialseed.com includes information on cultural requirements (description, watering and nutrient needs, harvesting, etc.).
-    Park Seed - www.parkseed.com features a plethora of seeds, plus related links.
-    Burpee - www.burpee.com
-    Seeds Trust - www.seedstrust.com specializes in specialty, native, heirloom and organic seeds.
-    Johnny's Selected Seeds - www.johnnyseeds.com offers many vegetables, flowers and herbs.
-    www.gardensalive.com specializes in "environmentally responsible products that work" and is dedicated to biological control of garden pests.

Wednesday, July 22, 2015

Spiced Zucchini Muffins and Other Tasty Recipes are a Great Way to Use Some of Your Garden’s Zucchini Harvest

I always plant zucchini in my veggie garden – most times the heirloom variety Black Beauty. This year, instead of the usual one or two plants, I have six.  I want to have a lot of zucchini this year so I can make plenty of zucchini relish, bread and butter zucchini pickles, and some amazing zucchini muffins, which I can store in the freezer and thaw them out as needed. Zucchini bread is great, but with just two of us in the family, muffins seem to work out a little better.

My hopes for lots of zucchini is happening – seriously! I have been picking two or three every day or two. I have made some zucchini relish and the muffins. We have also had grilled zucchini, sautéed zucchini, curried chicken with zucchini noodles, pan-fried zucchini patties, zucchini crust pizza, and more – all delicious!

Most of the time I start with a recipe that I have found online, but I never follow them, rather I use them for inspiration and modify them to include ingredients I use regularly or have on hand. I also use organic ingredients whenever possible. Even my husband loves these recipes. Here are some of them:

Shredded Zucchini
Ingredients
Finished Muffins
 Spiced Zucchini Muffins
(inspired by Chow.com)
Yield: 24 muffins

Ingredients:
3 Cups shredded and packed organic zucchini
2 Cups organic all-purpose flour
1 Cup organic whole wheat flour
1 ½ Teaspoons baking powder
1 ½ Teaspoons organic ground cinnamon
1 Teaspoon baking soda
½ Teaspoon nutmeg
½ Teaspoon sea salt
4 Large eggs (my homegrown were not quite large, so I used 5)
1 Cup packed organic dark Muscovado sugar (dark brown if you can’t find Muscovado)
1 Cup organic granulated sugar
1 Cup organic lemon/ginger coconut oil (plain if you can’t find the flavored)
2 Teaspoons organic vanilla extract

Instructions:
1.       Preheat the oven to 350 degrees F. Line muffin pans with paper liners (or coat the wells with unsalted butter).
2.       Place all of the dry ingredients into a medium bowl and whisk together until well blended.
3.       Place the remaining ingredients, minus the zucchini, into a medium bowl and whisk together until well combined. Fold in the zucchini until evenly mixed.
4.       Fill the muffin wells about 2/3 full. Bake for 25-30 minutes or when toothpick inserted into center comes out clean.
5.       Transfer the pans to racks to cool for 5 minutes before removing muffins from the pans. Remove muffins from the pans and cool completely

Double Recipe of Zucchini Relish.
The pint jars are purple glass.
Zucchini Relish
(inspired by Ball Blue Book)
Yield: about 4 half-pints

Ingredients:
2 Cups shredded zucchini, packed
1 Cup chopped onion (I use Walla Walla sweet from my garden)
½ Cup chopped sweet green pepper
½ Cup chopped sweet red pepper
2 Tablespoons canning salt
1 ¾ Cups organic granulated sugar
1 Tablespoon celery seed
1 Tablespoon mustard seed
2 Cups organic apple cider vinegar

Directions:
1.       Combine zucchini, onion, peppers; sprinkle with salt; cover with cold water. Let stand 2 hours. Rinse and drain thoroughly.
2.       Combine remaining ingredients in a large sauce pot. Bring to a boil. Add the vegetables; bring back to a boil and then simmer for 10 minutes.
3.       Pack the hot relish into hot jars, leaving ¼-inch headspace. Remove air bubbles. Adjust 2-piece caps. Process 15 minutes in a boiling-water canner.

Spiralized Zucchini Noodles
Some of the Chicken Curry Veggies
Chicken Curry with Zucchini Noodles
(inspired by Eat Local Grown)
Serves 4-6

Ingredients:
2 Teaspoons turmeric
1 Teaspoon Coriander
1 Teaspoon Cumin
1 Teaspoon sea salt
2 Teaspoons minced dried garlic
1 Teaspoon ground ginger
2 Tablespoons coconut oil
1 ½ Pounds skinless boneless chicken thighs, diced
1 Cup chicken broth
1 Can full fat coconut milk
3 medium carrots chopped
1 sweet red pepper diced
8 Ounces sliced mushrooms
1 Bunch Swiss chard
½ Pound sliced okra
4-5 medium zucchini, spiralized into noodles
Juice from ½ a lemon
Cilantro for garnish if desired

Instructions:
1.       Combine turmeric, coriander, cumin, salt, garlic and ginger in a small bowl. Set aside.
2.       Melt coconut oil in large skillet or pot over medium/high heat. Sauté chicken for 5-7 minutes, until no longer pink on the outside.
3.       Add spices, stir to combine, and cook for another minute. Add the chicken broth and coconut milk. Stir to combine.
4.       Add in carrots, red pepper, mushrooms, Swiss chard, and Okra. Bring to a boil and the turn down the heat and simmer for 5 minutes. Add the zucchini noodles and cook for another 5 minutes.
5.       Squeeze in lemon juice, garnish with cilantro. Serve.

Pan-fried zucchini patties served
with grilled salmon and baked potato
Pan-Fried Zucchini Patties

Ingredients:
1 medium zucchini grated (squeeze out excess juice)
1 beaten egg
2 Tablespoons dry pancake mix (I currently use Kodiak Cakes)
¼ Cup grated cheese (I like sharp cheddar or pepper jack)
½ Cup coconut oil

Instructions:
Mix all ingredients together. Form into about 4 patties. Pan-fry until cooked through and golden brown on both sides.

Zucchini Crust Pizza

Crust:
3 Cups grated zucchini (excess juice squeezed out)
2 eggs
½ Cup grated mozzarella
½ Cup grated cheddar

Instructions:

In a large bowl, beat eggs. Add all other ingredients and mix together. Spread out and pack/firm it together in a 9x13 greased pan (I grease with coconut oil). Bake at 400 degrees F for 15-20 minutes. Remove from the oven and add pizza toppings of choice. Put back in the 400 degree oven and bake for another 15-20 minutes.


Tuesday, July 14, 2015

Tips for Fire Resistant Landscaping

 
While driving around southeast Hesperia, I found
some examples of
  
fire-resistant landscaping,
here are two of them. This one shows a beautiful
design that includes grass and rock with a few shrubs.
The only thing that could be an issue is
the one palm tree planted right next to the home.
Another plus about this landscape is that it is completely
surrounded by a protective block wall fence
that can help to stop a fire at the property’s edge.
 

This home is in a more open space. It shows clearing
around the property with low growing, lush plantings
near the house. It does have a juniper, but it is isolated
and well away from the home.

With the ongoing drought and huge potential for wildfires, I thought it might be a good time to offer some fire-resistant landscaping information. For those who live in areas where wildfires are a real possibility, it is good idea to maintain a defensible space around your homes and use fire-resistant plant materials in your landscaping.

The Colorado State University Extension offers the following great information to protect your home from wildfires: “Vegetative clearance around the house (defensible space) is a primary determinant of a home's ability to survive wildfire. Defensible space is, simply, room for firefighters to do their job. If grasses, brush, trees and other common fuels are removed, reduced, or modified to lessen a fire's intensity and keep it away from the home, chances increase that the structure will survive. It is a little-known fact that in the absence of a defensible space, firefighters will often bypass a house, choosing to make their stand at a home where their safety is more assured and the chance to successfully protect the structure is greater.”

Consider the following factors, courtesy of the CSU extension, when planning, designing and planting a “Fire Wise” landscape within your home's defensible space:
-        Landscape according to the recommended defensible-space zones. That is, the plants near your home should be more widely spaced and lower growing than those farther away.
-        Do not plant in large masses. Instead, plant in small, irregular clusters or islands.
-        Use decorative rock, gravel and stepping stone pathways to break up the continuity of the vegetation and fuels.
-        Incorporate a diversity of plant types and species in your landscape. Not only will this be visually satisfying, but also it should help keep pests and diseases from causing problems within the whole landscape.
-        In the event of drought and water rationing, prioritize plants to be saved. Provide available supplemental water to plants closest to your house.
-        Use mulches to conserve moisture and reduce weed growth. Mulch can be organic or inorganic. Do not use pine bark, thick layers of pine needles or other mulches that readily carry fire.

Don’t forget about maintenance
A landscape is a dynamic system that constantly grows and changes. Plants considered fire resistant and which have low fuel volumes can lose these characteristics over time. Your landscape, and the plants in it, must be maintained to retain their “Fire Wise” properties.
-        Be aware of the growth habits of the plants within your landscape and of the changes that occur throughout the seasons.
-        Remove annuals and perennials after they have gone to seed or when the stems become dry.
-        Rake up leaves and other litter as it builds up throughout the season.
-        Mow or trim grasses to a low height within your defensible space. This is particularly important as grasses become dry.
-        Remove plant parts damaged by snow, wind, frost or other agents.
-        Timely pruning is critical. Pruning not only reduces fuel volumes but also maintains healthier plants by producing more vigorous, succulent growth.

Characteristics of fire-resistant plants
• Store water in leaves or stems
• Produce very little dead or fine material
• Possess extensive, deep root systems for controlling erosion
• Maintain high moisture content with limited watering
• Grow slowly and need little maintenance
• Are low growing in form
• Contain low levels of volatile oils or resins
• Have an open, loose branching habit with a low volume of total vegetation

The moisture content of plants is an important consideration because high levels of plant moisture can lower fire risk and act as a heat sink, reducing the intensity and spread of fire.

Some California native fire-resistant landscape plants suitable for the High Desert and many surrounding areas include: 
Western Redbud, Monkeyflower, Sage, Common Yarrow, California Sycamore, Toyon, California Fuchsia, Penstemon, California Poppy, and Flannel Bush.

Succulents such as Sedum or Ice Plant are also good choices for fire-resistant groundcovers on banks and hillsides.

Plants to avoid include Acacias, Eucalyptus, Cypress, Fir, Juniper, Pines and Chamise.

Visit following websites for lists of California-friendly fire-resistant plants and other valuable information for creating and maintaining a defensible space:


Sunday, July 5, 2015

The Tomato Hornworms Have Arrived

 
It is hard to tell in a photo,
but this hornworm is only about an inch long.
They can grow to be around 5 inches.
I discovered the first of this year’s tomato hornworms in my garden a couple of weeks ago. I found the first one quite by accident, which isn’t the way I normally find them. Usually I notice the missing leaves and sometimes the tell-tale caterpillar poo, which leads to a search to find the hungry invaders. This time I was eye-to-eye with the green creature. It had not yet done much in the way of damaging the plant as it was less than an inch long – small compared to what they can be. I looked around and found a second one on the same plant. I have been scouting for them ever since – on all 14 tomato plants – and so far so good.

Hornworms also can be a problem for tomato relatives like eggplant, peppers and potatoes, so it is a good idea to check them as well.

It can take a while to find them when I start looking for the nasty green worms because they blend in perfectly with the stems and foliage. Each year I have to retrain my eyes to spot them quickly. Hornworms have ravenous appetites and eat so much so quickly that they grow really fast. If I had taken a couple days longer to detect them, they could have easily been the size of a finger, and perhaps devoured much of the plant they were munching on.

How do you recognize a tomato hornworm? How do you manage them?

Here's a little information from the UC Davis website http://www.ipm.ucdavis.edu/PMG/GARDEN/VEGES/PESTS/hornworm.html

"Tomato hornworms of all sizes have a distinctive horn at the rear end. If you find them early on they are small, but mature caterpillars are very large - up to 4 inches long. Tomato hornworms are likely to be the largest caterpillars you will see in the vegetable garden. Their striping pattern makes them hard to spot despite their size. Large, black droppings on the ground beneath tomato plants or on the leaves below where they are feeding usually indicate the presence of hornworms. The adult moths that are responsible for these worms have a wingspan up to five inches.

Damage by hornworm larvae (the worm/caterpillar) is usually most common in midsummer, but there may also be a small population peak in the late summer. Infestations tend to be more severe in warm inland areas such as the High Desert. The larval form is the only stage that causes damage. The eggs are laid singly on leaves. The larvae feed and grow, and then burrow into the soil to pupate. The adult/moth develops over the winter and emerges and the cycle continues. Entire leaves and small stems may be consumed by the larvae. Large pieces from green or ripe fruit may also be chewed.

To manage hornworms, handpick or snip hornworms with shears. Hornworm eggs can be attacked by Trichogramma and the larvae of Hyposoter exigua - two types of parasitic wasps - which can be purchased through various catalogs and released into the garden. There are also several general predators such as praying mantids to help keep populations under control. Bacillus thuringiensis (Bt) or Spinosad are both effective against smaller larvae. Discing or rototilling the soil after harvest destroys the pupae and helps prevent adults from developing."

I tend to handpick the hornworms from the plants, and then feed them to my chickens. It is important to keep looking and not assume there are only one or two. It is best to look for them early in the morning, because they tend to hide out during the heat of the day. Look along the stems and under the leaves, especially near the ends of the branches and near where damage has been found. If you notice the droppings, look above that area. Tomato hornworms used to scare me so I would snip them with shears, but the disgusting green goo they leave behind is not very appealing. I eventually learned to put on a pair of gardening gloves and simply pick the worms off the plant.

Chickens enjoy feasting on tomato hornworms, so if you happen to have chickens, it's a great way to dispose of the worms once you have removed them from your plants. If you notice the eggs or pupa (cocoon), destroy them before they develop into the dreaded hornworm.